Making spindles with chopsticks & fimo.
I've previously posted about making my own spindles during the Tour de Fleece this year, & wanted to make some more, experimenting with whorl size and shape. The spindles are so simple to make, using fimo clay, chopsticks, a pencil parer, a craft knife and some sandpaper (or in this case a sanding pad).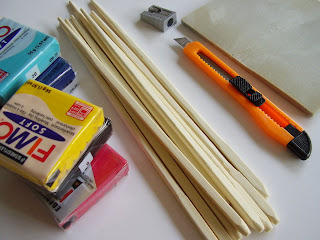 I'm using the chopsticks because their slight taper allows me to slip the whorl over the shaft of the spindle, and wedge it into place at the thick part of the shaft. First I shaped the chopsticks; tidying up the thick end using the pencil parer. (untouched chopstick on the left for comparison)
 I marked around the shaft about 4 or 5 cm from the thick end of the chopstick. I then whittled away the chopstick corners along the length of the stick, stopping at the mark at the thick end of the stick.
 See the square edge on the left, the unchanged chopstick? I lightly sanded along the stick to make it smooth & get rid of potential splinters & anything that could snag fibre.
 I've been experimenting with notches on some spindles, cut into the stick about 2cm from the thin end of the stick - and sanded.

 Then came the really fun part; playing with fimo. In theory, you want a balanced whorl, that will have an even weight distribution while spinning. I made a few different shapes in the fimo clay; experimenting with thickness, circumference and weight distribution. I pierced the centre of the whorls with the spindle shafts to try get a perfect fit.
 After oven-baking I fitted the whorls onto the chopsticks, slipping them on to the sticks from the thinner end of the stick.

 So, a test-run. (please excuse the dirt under my nails - it's fimo clay) To spin a bottom-whorl spindle, attach the leader just over the whorl, on the long portion of the shaft (to the left here) - wrap it over the whorl, around the shaft, and back over the whorl.
 Attach the leader at the top of the shaft (narrow end) using a half-hitch...
 ... and spin.

 I find it difficult to spin bottom whorl spindles - I cannot get as much momentum spinning with a spindle in this position.
 I realised I could easily make a top-whorl spindle by cutting a notch into the thick (short) end of the spindle shaft.
 It started to get dark at this point so the photos are not great, apologies.
 I'm using the chopsticks because their slight taper allows me to slip the whorl over the shaft of the spindle, and wedge it into place at the thick part of the shaft. First I shaped the chopsticks; tidying up the thick end using the pencil parer. (untouched chopstick on the left for comparison)
 I marked around the shaft about 4 or 5 cm from the thick end of the chopstick. I then whittled away the chopstick corners along the length of the stick, stopping at the mark at the thick end of the stick.
 See the square edge on the left, the unchanged chopstick? I lightly sanded along the stick to make it smooth & get rid of potential splinters & anything that could snag fibre.
 I've been experimenting with notches on some spindles, cut into the stick about 2cm from the thin end of the stick - and sanded.
 Then came the really fun part; playing with fimo. In theory, you want a balanced whorl, that will have an even weight distribution while spinning. I made a few different shapes in the fimo clay; experimenting with thickness, circumference and weight distribution. I pierced the centre of the whorls with the spindle shafts to try get a perfect fit.
 After oven-baking I fitted the whorls onto the chopsticks, slipping them on to the sticks from the thinner end of the stick.
 So, a test-run. (please excuse the dirt under my nails - it's fimo clay) To spin a bottom-whorl spindle, attach the leader just over the whorl, on the long portion of the shaft (to the left here) - wrap it over the whorl, around the shaft, and back over the whorl.
 Attach the leader at the top of the shaft (narrow end) using a half-hitch...
 ... and spin.
 I find it difficult to spin bottom whorl spindles - I cannot get as much momentum spinning with a spindle in this position.
 I realised I could easily make a top-whorl spindle by cutting a notch into the thick (short) end of the spindle shaft.
 It started to get dark at this point so the photos are not great, apologies.
 I intend to test-spin all spindles over the coming days to see how the whorl shape affects my spinning. I'm also wracking my brains to think of other useful objects I could make from fimo clay. A new addiction, perhaps.


Great tutorial post! Can't wait to see some of the spindles at the next spin in.
ReplyDeleteCool!!!
ReplyDeleteHow about buttons?
Great post, lovely photos. You're so much better at Fimo than I am!
ReplyDeleteThose are very cool. Love them! There must be a knack to bottom whorl spindling. I haven't got it yet though.
ReplyDeletelooks lovely, the fimo when it dries, very attractive spindles, must give it a shot, thanks for sharing!
ReplyDeleteliz